Ever since the April 2018 update of Windows 10, the Windows Rollback Boot Loop has become an issue for Windows users. A lot of users have reported this error in the community forums, and a lot of solutions have been proposed as well.
What is Windows Rollback Boot Loop?
Windows Rollback Boot Loop is an issue in which you see the blue screen over and over again. This screen asks you to choose the keyboard layout and language. Even if you try to restart your computer, the same screen will come up again and again. Of course, using your computer becomes impossible with such a situation at hand.
Normally, this error is due to corrupted files or any error in the boot parameters. The most straightforward method for solving this problem would be to reinstall Windows or restore it. However, this is not the only way to solve the issue.
How to fix Windows Rollback Boot Loop?
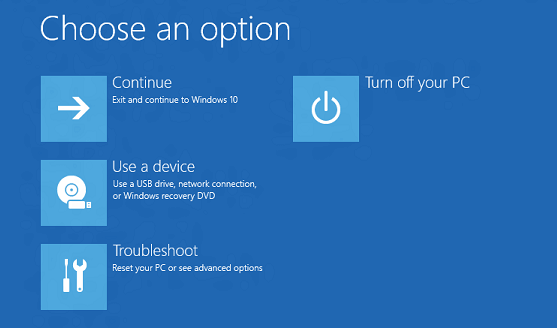
There are different ways to fix Windows Rollback Boot Loop. Before you try reinstalling Windows 10, you should try one of the solutions given below. First of all, you need to go to Windows 10 Recovery Mode.
For this, boot your PC and while booting, press F8 multiple times. This would take you to Recovery Mode. If F8 does not work, try F11. When you are in recovery mode, you can use the methods given below to solve the problem.
Solution 1: Command Prompt
- When you are in Recovery mode, select Troubleshoot from the menu.
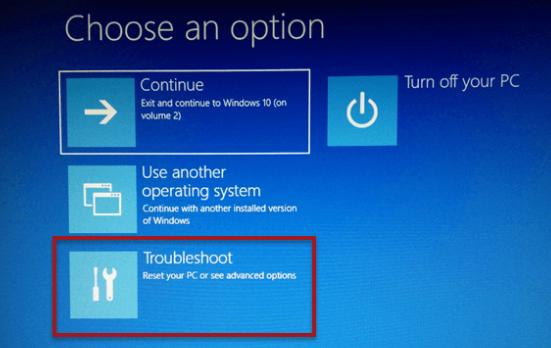
- Then, go to Command Prompt.
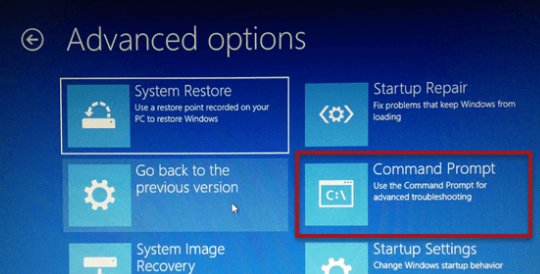
When you are in Command Prompt, enter the commands given below. Press Enter after every command. If Windows 10 is a drive other than C, enter the name of that drive.
chkdsk c: /f
sfc /scannow
bootrec /fixmbr
bootrec /fixboot
bootrec /rebuildbcd
bcdboot c:\windows /s c:
After you enter the commands, the computer should restart on its own. If it does not, restart it yourself. This should solve the rollback boot loop issue.
Solution 2: Disabling Automatic Restart
You can also solve this problem by disabling automatic restart. First of all, go to Safe Mode by pressing F8 continuously while restarting the computer. When the Windows starts in Safe Mode, search for sysdm.cpl and press Enter.
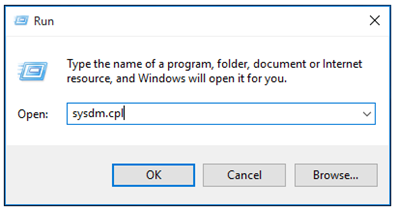
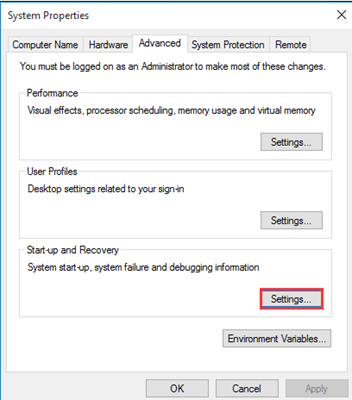
This will take you to System Properties. Go to Advanced and then click on Settings. This option will be present under the ‘Start-up and Recovery’ section.
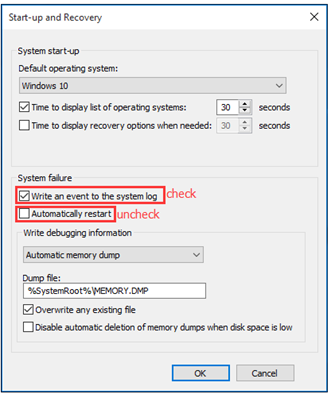
When you see the box with the label ‘Automatically Restart’ option, uncheck the box. Check the box with ‘write an event to the system log.’
Then, click on OK to apply the settings. Restart your computer and see if it goes to its normal state. Sometimes, the problem might be due to the fact that an automatic restart is disabled. This is why the computer is unable to be normal. However, if this method does not work, you can try the method given below.
Solution 3: Remove Bad Registry
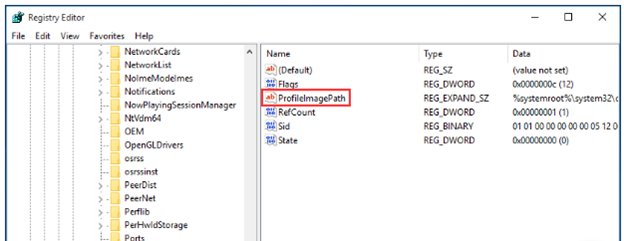
Just like all the previous solutions, start this one by restarting your computer in the Safe Mode. When the computer starts in Safe Mode, go to the Run window and type ‘regedit’ in the search box. This will open the Registry Editor. Navigate to the path given below.
“HKEY_LOCAL_MACHINE\SOFTWARE\Microsoft\WindowsNT\CurrentVersion\ProfileList”.
Go through the ProfileLists IDS and look for ProfileImagePath. If you see any of them, you need to remove them since they should not be there.
Once you have deleted them, exists the registry. Now, restart your computer, and this will solve the issue of the Windows rollback boot loop.
Solution 4: Use Start-Up Repair
When Windows 10 is stuck in a rollback boot loop, you will not be able to get into Advanced Options so easily. Try booting using a USB or DVD. First of all, connect the USB media to your computer and start your computer. When you have to boot from a CD or DVD, press a key.
You will come across the Windows 10 install window. Here, select the time, currency, keyboard settings, and the input language. Now, click on Next. Click on Repair your computer. When you choose the OS that you want to repair, you will be able to see the Troubleshoot option.
Select Troubleshoot, then Advanced Options, and go to Startup Repair. It will start to diagnose your system. If there is a problem, the Startup Repair will try to repair it.
Solution 5: Refresh Windows 10
If nothing else is fixing the Windows rollback boot loop problem, you will have to reinstall Windows 10 on your computer. Do not try this as the first method as you might be able to solve the problem by using the aforementioned solutions. Only in case none of these methods are working, you can restore the computer or reinstall Windows. Before you do that, make sure that you create a backup of all your important data.
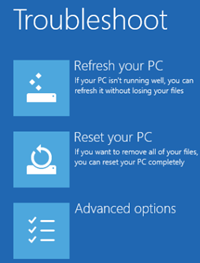
Do what you did in the previous method and go to Automatic Repair. From Automatic Repair, go to Advanced Options and then to Troubleshoot. Here, select ‘Refresh your PC.’ When you select this, the programs installed on your computer will be lost. However, the files will still be there.
Alternatively, you can also select the ‘Reset your PC’ option. Keep in mind that this method will remove all files from your computer. You can choose this method if you do not have any important files on your computer that you are worried about losing. After selecting the option, follow the on-screen instructions to finish the process. When your computer restarts again, it will take you to the normal start-up page. This is the last resort for solving the rollback boot loop.
Conclusion
When your computer is stuck in a rollback boot loop, it can be very irritating. First of all, you would not be able to use your computer for anything. Secondly, it is very annoying that the computer keeps rebooting, without coming to its normal condition. Here, we have mentioned some solutions for this issue. We hope that one of these works for you so that you can use your computer again.
Recent Comments