
Changing your DNS (Domain Name System) settings can offer benefits like faster internet speeds, enhanced privacy, and improved reliability. DNS acts like the internet’s phonebook, translating human-friendly domain names into machine-readable IP addresses. This process, if optimized by choosing the right DNS server, can significantly enhance your online experience by reducing loading times and increasing reliability.
For those using Windows 10, learning how to change the DNS settings is particularly straightforward and can bring about immediate improvements in how you interact with the digital world. This guide will walk you through several methods to update your DNS settings in Windows 10, using the Settings app, Control Panel, and Command Prompt. Each method offers a step-by-step process, ensuring that even users who are not technically savvy can successfully update their settings to better suit their needs.
What is DNS?

The Domain Name System, or DNS, functions much like the internet’s address book. It converts easy-to-remember domain names, such as “google.com,” into numerical Internet Protocol (IP) addresses, like “192.168.1.1” for IPv4 or “2400:cb00:2048:1::c629:d7a2” for IPv6, which computers use to identify each other on the network. Without DNS, we would need to memorize these complex numbers to access websites, which would be impractical.
Here’s a simpler example: just as you might look up a contact in your phone’s address book to find their phone number, your computer uses DNS to look up a website to find its corresponding IP address. When you enter a website name in your browser, the DNS system starts working behind the scenes. It queries various DNS servers to find the exact IP address associated with that domain name. Once the IP address is located, your computer can then initiate a connection to the server hosting the website and fetch the page to display it to you.
The whole DNS lookup process is incredibly fast, often completed in milliseconds, and typically goes unnoticed. However, the reliability and speed of DNS resolution can significantly affect your browsing experience. Slower DNS servers can lead to longer wait times for web pages to load, which is why some users opt to switch to faster, more reliable DNS providers. Moreover, DNS is not just about speed; it also involves privacy. Every time you visit a website, your DNS query—what sites you visit—is visible to whoever runs the DNS service, which can often be your internet service provider (ISP). Privacy-conscious users might choose DNS providers who promise better privacy policies and do not log DNS queries.
Windows 10 and other operating systems allow users to customize which DNS servers they use. You can change your DNS settings via the Control Panel, Command Prompt, or the Settings app, enabling you to choose a provider that offers the best mix of speed, reliability, and privacy based on your needs. Understanding DNS is essential as it helps you troubleshoot potential internet connectivity issues and enhances your overall internet experience by allowing you to make informed decisions about your DNS server settings.
Why Change DNS on Windows 10?
Changing the DNS (Domain Name System) settings on a Windows 10 computer can be beneficial for several reasons:
Speed
Different DNS servers can process your requests at different speeds. By switching to a faster DNS server, you may experience quicker domain name resolution, which can slightly speed up your browsing.
Reliability
Some DNS servers may be more reliable than others. If you frequently encounter DNS errors or cannot access certain websites, switching to a more reliable DNS service might help.
Security
Some DNS providers offer additional security features such as protection against phishing attacks, malware domains, and other malicious activities on the internet. By using such DNS services, you can enhance your overall internet security.
Privacy
DNS requests can reveal a lot about your internet activity. Some DNS providers are committed to user privacy and do not log any DNS queries, or they anonymize the logs they do keep. Switching to these providers can help protect your privacy online.
Content Filtering
Certain DNS servers offer content filtering features which can be useful for blocking unwanted sites, especially in environments like schools or workplaces. Parents might also use this feature to restrict the kind of content their children can access online.
Custom Configuration
Advanced users might want to configure their DNS settings to interact with specific services better, or to use features like smart routing, geo-spoofing, or to improve compatibility with certain network configurations.
How to Change the DNS Settings in Windows 10 Using Settings App?
If you’re looking to learn how to change the DNS settings in Windows 10 using the Settings app, here is a straightforward guide to help you through the process:
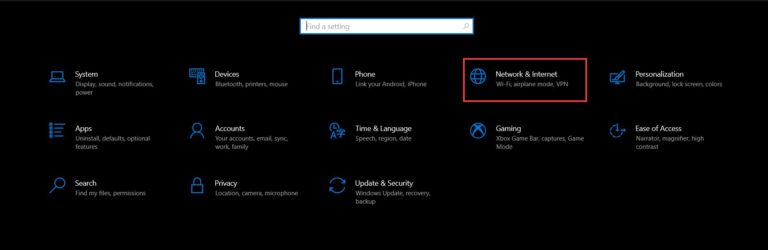
- Open the Settings app from your Start menu.

- Select Network & Internet.
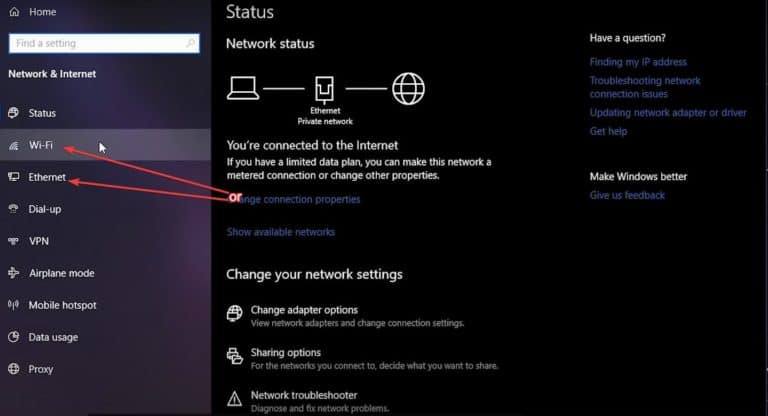
- Click on Ethernet or Wi-Fi, depending on your connection method.
- Choose the network you’re currently using to access the Internet.
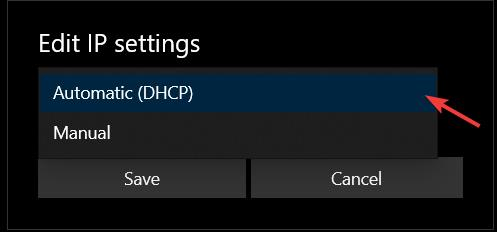
- Find the IP settings section and click the Edit button.

- Change the setting in the “Edit IP settings” drop-down to Manual.
- Activate the IPv4 toggle to enable manual DNS configuration.
- Enter your preferred DNS server in the “Preferred DNS server” field. Options include:
- Cloudflare: 1.1.1.1
- Google Public DNS: 8.8.8.8
- OpenDNS: 208.67.222.222
- Enter an alternate DNS server in the “Alternate DNS server” field:
- Cloudflare: 1.0.0.1
- Google Public DNS: 8.8.4.4
- OpenDNS: 208.67.220.220

- Click the Save button to apply your new settings.
- Restart your device to ensure all settings take effect and the network configuration updates properly.
Following these steps will enable your Windows 10 device to use your selected DNS servers for faster and possibly more secure internet browsing. This process is straightforward through the Settings app, although some might find other methods easier.
How to Change the DNS Settings in Windows 10 Using Control Panel?
To understand how to change the DNS settings in Windows 10 using the Control Panel, follow these clear and structured steps:
- Open the Start menu and type Control Panel, then select the Control Panel app.
- Click on Network and Internet.
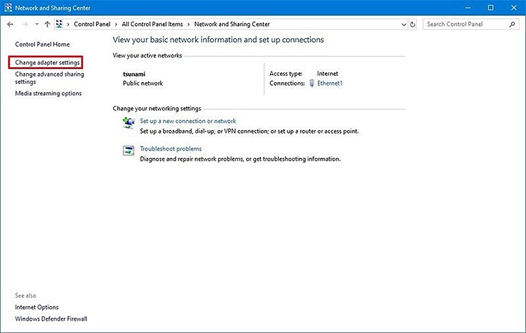
- Select Network and Sharing Center.
- On the left, click Change adapter settings.
- Right-click the network interface you use to access the internet and choose Properties.
- Scroll to and select Internet Protocol Version 4 (TCP/IPv4), then click the Properties button.

- Choose the Use the following DNS server addresses option.
- Enter your primary DNS in the Preferred DNS server field.
- Enter your secondary DNS in the Alternate DNS server field.
- Google Public DNS: Preferred: 8.8.8.8, Alternate: 8.8.4.4
- OpenDNS: Preferred: 208.67.222.222, Alternate: 208.67.220.220
- Cloudflare: Preferred: 1.1.1.1, Alternate: 1.0.0.1

If necessary, click “Advanced” and go to the DNS tab to add, edit, or remove DNS addresses and adjust their priority.
- Click OK to save the settings.
- Close all remaining windows by clicking Close.
How to Change the DNS Settings in Windows 10 Using Command Prompt?
By following the steps mentioned below, you can easily learn how to change the DNS settings on Windows 10 using Command Prompt.
- Click the Start button.
- In the search bar, type Command Prompt.
- Right-click on the Command Prompt in the search results and choose Run as administrator.

- In the Command Prompt, type “netsh” and press Enter to access the Network Shell.

- Type “interface show interface” and press Enter. This command will display a list of all network interfaces. Note the name of the adapter you want to change.
- Use the command interface ip set dns name=”ADAPTER-NAME” source=”static” address=”X.X.X.X”. Replace “ADAPTER–NAME” with the actual name of your network adapter. Replace “X.X.X.X” with the IP address of the primary DNS server you wish to use (e.g., Google Public DNS: 8.8.8.8).
To use Cloudflare, Cisco OpenDNS, or Google Public DNS, you can use these settings:
- Cloudflare: 1.1.1.1 and 1.0.0.1
- Google Public DNS: 8.8.8.8 and 8.8.4.4
- OpenDNS: 208.67.222.222 and 208.67.220.220
- Input interface ip add dns name=”ADAPTER–NAME” addr=”X.X.X.X” index=2.
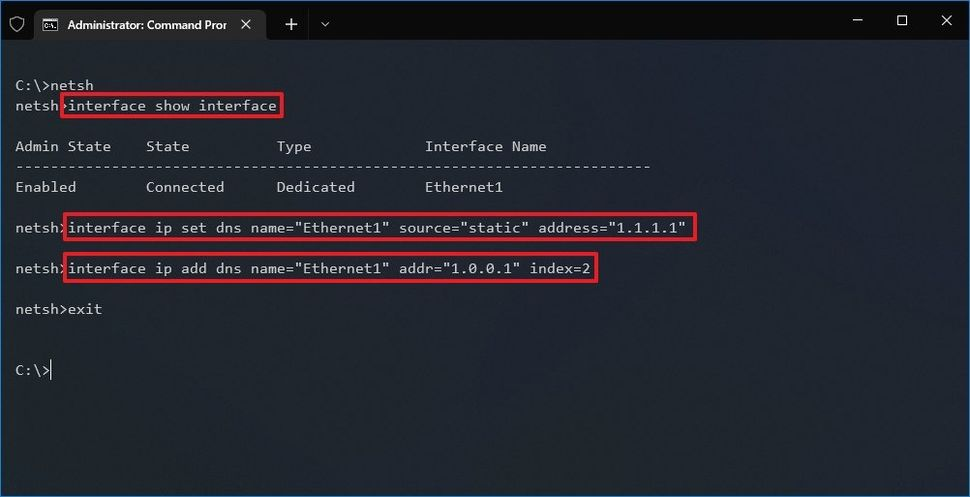
Again, replace “ADAPTER-NAME” and “X.X.X.X” with your adapter name and the secondary DNS server’s IP (e.g., Google Public DNS: 8.8.4.4). If you want to add more DNS servers, repeat the last step but increase the index number by 1 each time. For example:
interface ip add dns name=”Ethernet1″ addr=”1.1.1.1″ index=3.
Should You Update Your IPv4 Address to IPv6 Address?

The Internet Protocol version 6 (IPv6) has been introduced as a necessary upgrade due to the depletion of IPv4 addresses, which have been in use since the 1980s. IPv6 addresses this shortage with a vastly expanded address space, among other improvements. However, the question of whether you should change your IPv6 address, or more specifically, transition from IPv4 to IPv6, can be influenced by several factors, particularly the support from your Internet Service Provider (ISP) and the readiness of your network infrastructure. IPv6 offers significantly more address combinations than IPv4, theoretically making it possible for an almost unlimited number of devices to connect to the internet. Here are some more considerations for switching to IPv6:
ISP Support
The first step in determining whether to switch to IPv6 is to check whether your ISP supports it. You can easily test this by visiting websites like Test-IPv6.com, which can analyze your connection and determine whether you are already using IPv6 and how well your network supports it.
IPv6 Readiness of Devices
Ensure that your own network infrastructure (like routers and other networking hardware) and connected devices are IPv6 compatible. Older hardware may require upgrades or replacements to support IPv6.
Security and Configuration
IPv6 comes with different security considerations. The protocol’s features, such as the absence of Network Address Translation (NAT), which inherently acts as a rudimentary firewall in IPv4, means rethinking security strategies. Additionally, configuring IPv6 might require more technical expertise compared to IPv4.
Benefits of IPv6
Beyond the larger address space, IPv6 includes enhancements in packet processing, routing, and mobility support, which can improve network efficiency and performance. However, these benefits can only be realized if both the origin and destination of your internet traffic support IPv6.
Despite this advantage, the need to switch to different DNS servers specifically for IPv6 isn’t always immediate. Many Internet Service Providers (ISPs) are still in the early stages of adopting IPv6, with some not supporting it at all yet.
To determine whether your ISP has adopted IPv6, you can visit the Test-IPv6 website from your current internet connection. This site will analyze your connection and inform you of your ISP’s IPv6 capabilities. If your ISP supports IPv6, you’ll find that many third-party services also offer IPv6 addresses, although it’s not compulsory to change your DNS servers just because you have IPv6 capability.
Bottom Line
Understanding how to change your DNS settings in Windows 10 can significantly enhance your browsing experience in terms of speed, security, reliability, and privacy. Whether you opt to use the Settings app, Control Panel, or Command Prompt, each method provides a straightforward pathway for configuring your network’s DNS settings to better suit your individual or organizational needs. Furthermore, considering the transition to IPv6 can be an important step depending on your ISP’s support and your infrastructure’s readiness. The guide above outlines the steps and reasons for making these changes, ensuring that you can make informed decisions regarding your DNS preferences on Windows 10. As the internet continues to evolve, staying updated with such configurations will keep your network performance optimized and secure. That’s all for today. If you like this article, share it with your family and friends.
Recent Comments