Changing the network from public to private on your Windows device is important for enhancing security and connectivity in environments where you trust other devices, such as at home or in the office. Public networks offer minimal visibility and disabled sharing features to protect your privacy in public settings like cafes or airports, whereas private networks allow for device visibility and sharing functionalities ideal for more secure or personal spaces. The steps to adjust your network setting vary depending on your Windows version. Whether you’re using Windows 10, Windows 8, or Windows 7, the process varies slightly, but each involves simple steps that secure your network connections effectively.
If you’re using Windows 10, you may wonder, “How Do I Change From Public to Private Network in Windows 10?” Fortunately, the process is straightforward and can be done through various methods including Wi-Fi settings, Ethernet settings, PowerShell commands, Group Policy settings, or even through the Windows Registry. Each method provides a secure and efficient way to modify your network’s visibility and access permissions, ensuring that your device operates optimally in trusted environments.
What Are Public and Private Networks?
Private Network Profile
This network profile is ideal for environments you trust, such as your home or workplace. When your device is connected to a private network, it becomes visible to other devices on the same network. This visibility allows for functionalities like file and printer sharing.
Public Network Profile
Conversely, a public network profile is designed for use in potentially insecure, public locations such as airports, coffee shops, and other areas offering public Wi-Fi. In this setting, your device will not be visible to other devices on the network, and features like file and printer sharing are disabled to protect your privacy and security.
How to Check Your Current Network Type on Windows 10?
To determine whether your network is set to public or private, you can follow these simple steps:
- Right-click on the Start button located at the bottom-left corner of your screen.
- Select the Control Panel from the menu that appears.
- Once the Control Panel window is open, look for and click on Network and Internet.
- Within the Network and Internet options, click on Network and Sharing Center.
Here, you’ll see the name of your currently connected network. Directly beneath the network name, the network type (public or private) is displayed, giving you a clear view of your current setting.
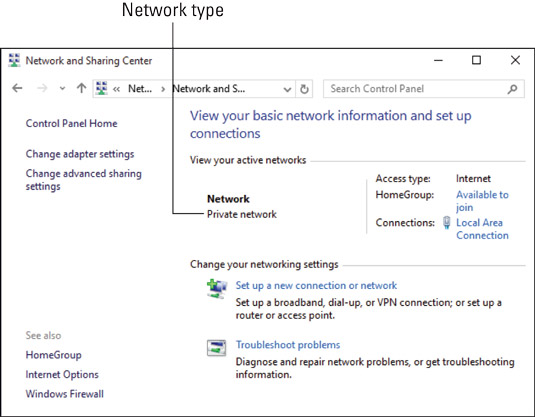
- After reviewing your network settings, close the Control Panel window to finish up.
How Do I Change From Public to Private Network in Windows 10?
To perform a change from a public to a private network in Windows 10, you can use several methods depending on your connection type, including Wi-Fi settings, Ethernet settings, PowerShell commands, and more. Let’s explain these methods in detail below, starting with Wi-Fi settings;
How to Change From Public to Private Network Using Wi-Fi Settings?
- Start by opening the settings app in Windows.
- Click on Network and Internet in the left sidebar.
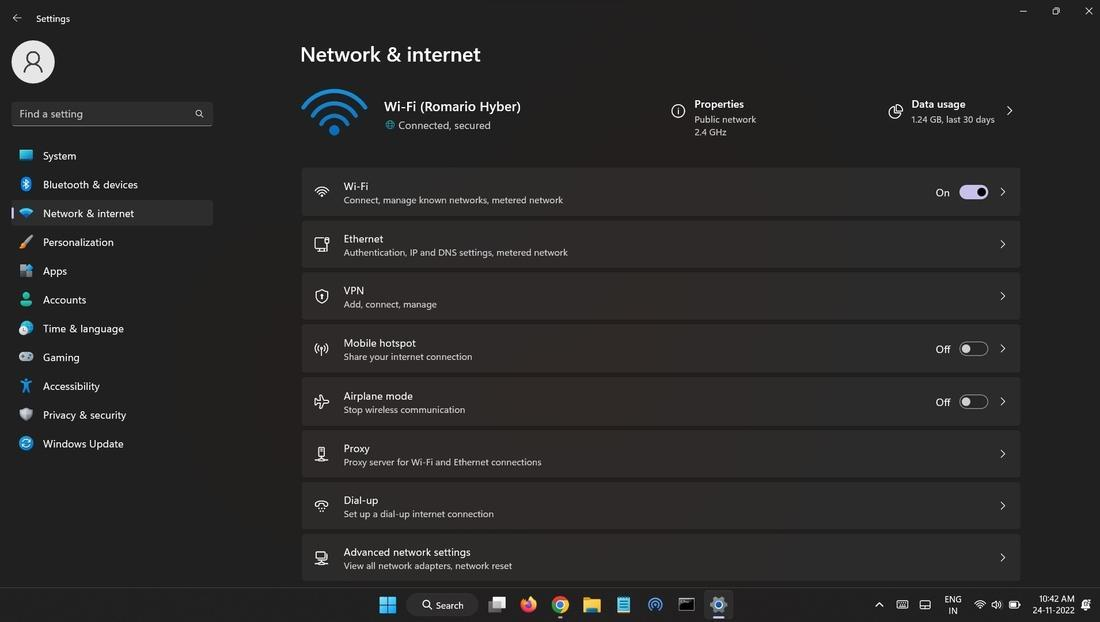
- Select Wi-Fi from the options available.
- Click on the network you are currently connected to.
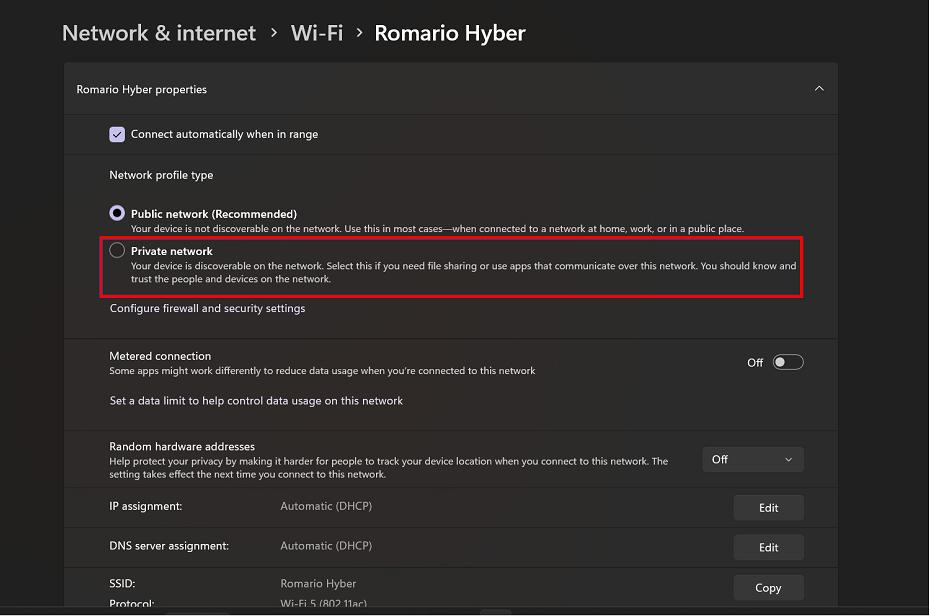
- In the settings for your network, find and select the Private network option under Network profile type.
Alternative Quick Method:
- Click on the Wi-Fi network icon located on the right side of the taskbar.
- Find and click on Properties under the name of your currently connected Wi-Fi network.

- In the Network profile section, choose the Private radio button to switch the network type.
Both methods will set your network profile to Private, enhancing security by not being discoverable to other devices and allowing the use of file sharing and device discovery within a trusted network.
How to Change From Public to Private Network Using Ethernet Settings?
To configure your wired Ethernet connection as a private network in Windows, simply follow these steps:
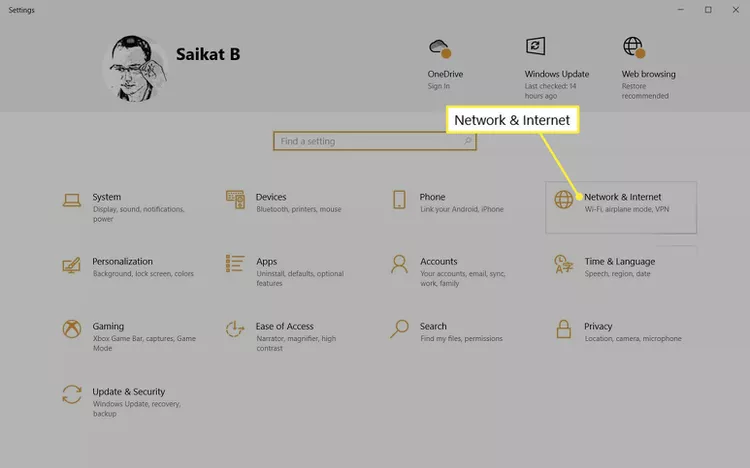
- Open the Start menu, then click on Settings followed by Network & Internet.
- In the left sidebar, click on Ethernet. Additionally, you might see a Properties button under the Ethernet connection on the Status page which you can select.
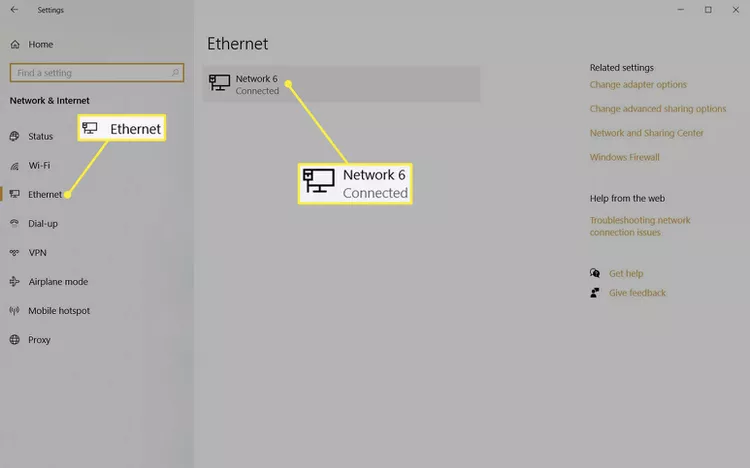
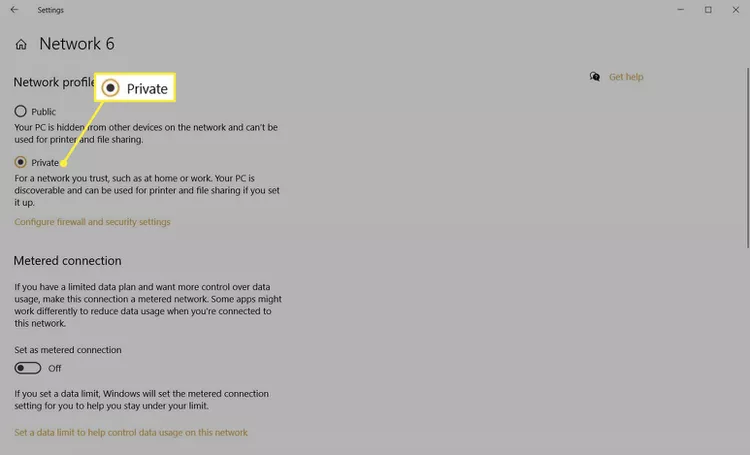
- Click on the name of your Ethernet connection listed on the right side.
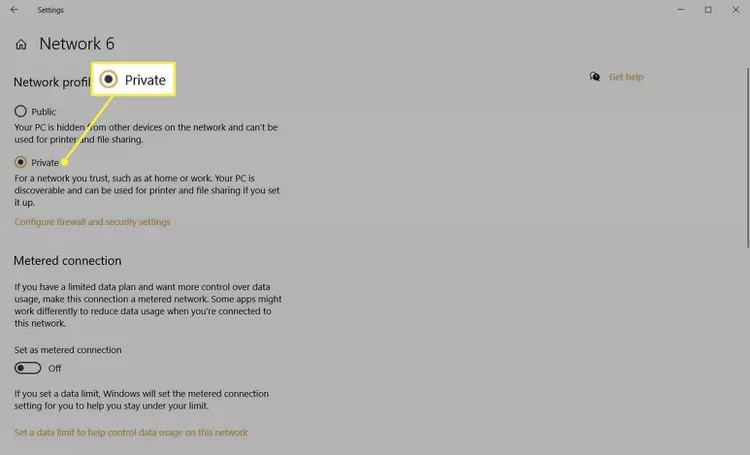
- Look for the Network Profile section and choose the Private option by selecting the corresponding radio button. This is the recommended setting when you want your network to be more secure but still allow device discovery and sharing within your home or business network.
- After making your selection, close the Settings window.
This adjustment will enable your PC to discover other devices connected to the network, such as other computers and networked printers. If you need to revert to a public network setting for any reason, you can follow these same steps and choose the Public option instead.
How to Change From Public to Private Network Using PowerShell?
To adjust your computer’s network settings using PowerShell commands, it’s essential to run PowerShell with administrative privileges. Here’s how to get started:
- Press the Windows key + X.
- Select Windows PowerShell (Admin) from the menu.
- Confirm the prompt by clicking Yes to allow the program to run with administrative privileges.
Once PowerShell is up and running, you can perform various network-related tasks. Here’s how you can manage network profiles directly from PowerShell:
- To view all the existing network profiles and their settings, use the following command: Get-NetConnectionProfile
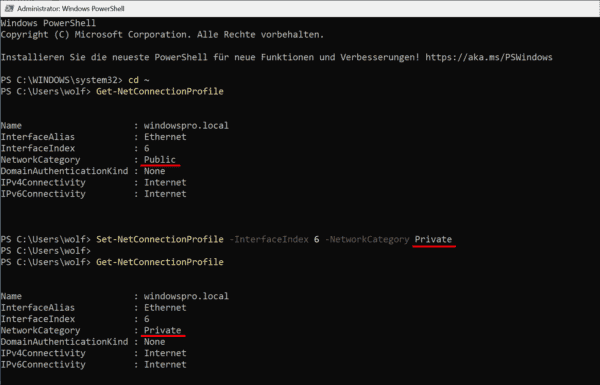
This command displays details about each network profile, including their names, interface aliases, and whether they are set to Public, Private, or DomainAuthenticated.
- To change the network category for a specific network interface, such as changing an Ethernet connection to Public, you would use: Set-NetConnectionProfile -InterfaceAlias Ethernet -NetworkCategory Public.
In this command, you need to specify either the Name, InterfaceAlias, or InterfaceIndex of the network profile you wish to change. These identifiers can be found by using the Get-NetConnectionProfile command.
- If you need to change the category of all network profiles at once, for example to Private, you can combine commands like this:
Get-NetConnectionProfile | Set-NetConnectionProfile -NetworkCategory Private
This pipeline command retrieves all network profiles and changes each of their categories to Private in one go.
It’s important to note that setting a network profile to DomainAuthenticated manually is not possible. Attempting to do so will result in an error:
Unable to set NetworkCategory to ‘DomainAuthenticated. This NetworkCategory type will be set automatically when authenticated to a domain network.”
This is because the DomainAuthenticated status is automatically configured by the system when the network is authenticated against a domain controller, and cannot be set manually. Using these PowerShell commands allows you to efficiently manage and troubleshoot network settings directly from your admin terminal, providing a powerful tool for system administration.
How to Change From Public to Private Network Using Group Policies?
- Go to Local Group Policy Editor in Windows.
- In the Local Group Policy Editor, Click on Windows Settings, followed by Security Settings. And then click on Network List Manager Policies.
- Find the network you are currently connected to listed under Network List Manager Policies. Right-click on it and choose Properties from the context menu.
- In the network properties window, click on the Network Location tab.
- Under the Network Location tab, you’ll find an option to set the Location Type. Select Private to make your network location private.

These steps will help you secure your network by setting its location type to Private, which is ideal for home or office networks where you trust other devices connected to the same network. This setting helps control which network features and security settings are applied.
How to Change From Public to Private Network Using the Registry?
- Open the Registry Editor.
- Go to HKEY_LOCAL_MACHINE
- Then, click on SOFTWARE
- Followed by Microsoft
- Then Windows
- Next, NT
- Then CurrentVersion
- Finally, click on NetworkList and then Profiles. This area lists all network connections.
- In the Profiles section, look for a folder named with a GUID format (like {xxxxxx-xxxx-xxxx-…}).
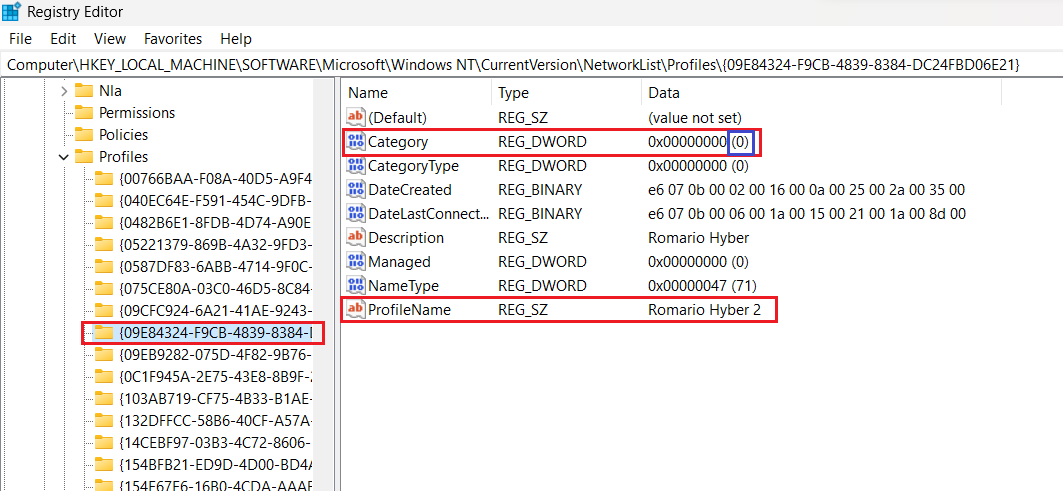
- Click on it, and on the right side, look for ProfileName to see the network’s name.
- Locate the Category value in the same right-side panel.
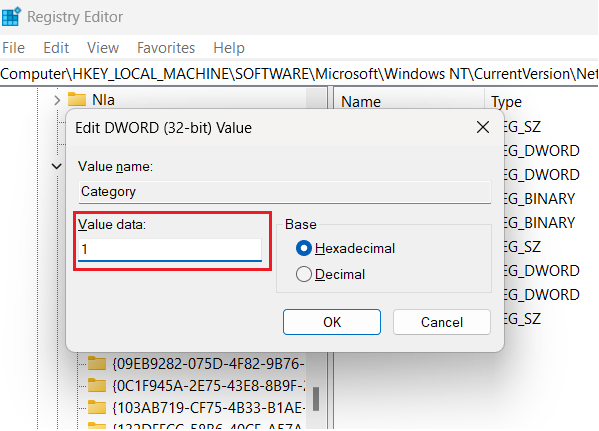
- Double-click on Category and change the value to set your network type:
- 0 for Public Network
- 1 for Private Network
- 2 for Domain Network
- Click OK to save the changes.
Now your network type is set as private, if you entered 1 for private network.
How to Change Network from Public to Private Windows 7?
If you’re using Windows 7 and need to switch your network from public to private for security reasons or network functionality, the process is straightforward. Here’s a detailed guide on how to change the network type:
- Click on the Network icon.
- From the small popup that appears, click on the Open Network and Sharing Center link to proceed to the control panel for network settings.
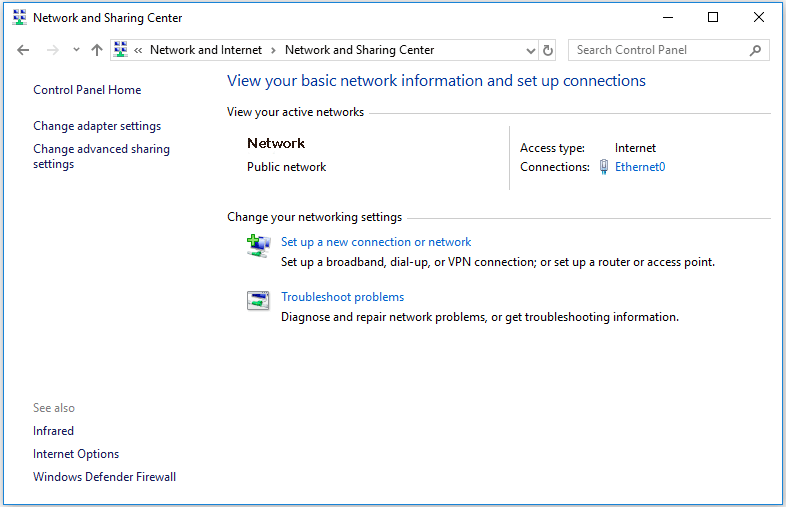
Once you’re in the Network and Sharing Center, you’ll see an overview of your current connections.
- Look under the section titled View your active networks. Here, you will see the name of the network you’re connected to along with an icon representing the type of network (house for home, building for work, or bench for public).
- Find the current network location type labeled either as Home network, Work network, or Public network right beneath the network name. This designation is crucial as it dictates how your computer interacts with other devices and how visible your device is on the network.
- Click on the current network designation (link). This action will prompt a dialog box where you can change the network setting.
- Upon clicking the network type link, you will be presented with a choice to select a new network location. The options will be:
- Home network: Choose this if you are using your computer in a personal residence. It allows for easier sharing and network discovery.
- Work network: Ideal for small office settings where you need to see and share files with other computers.
- Public network: Best for connections in public places like cafes or airports, where you want the most security and minimum visibility.
- Select Home network or Work network to set your network to private.
After selecting your preferred network type, Windows will apply the settings, and you should:
- Verify that the change has been implemented by looking at the network type under “View your active networks” to ensure it now reflects your choice.
- Test your connection if necessary, by browsing the Internet or accessing other network resources to ensure everything is functioning as expected.
How to Change Network from Public to Private Windows 8?
- Right-click on the Network icon, then select Open Network and Sharing Center.
- If your network is classified as a Public network, select Change advanced sharing settings on the left sidebar, and set it to Private. Ensure that the following options are activated: Turn on network discovery, Turn on file and printer sharing, and Allow Windows to manage homegroup connections.
- Next, go to the Guest or Public section and check the boxes for Turn off network discovery and Turn off file and printer sharing.
- Finally, navigate to your computer’s Settings and click on the Network icon. Right-click the network and select Turn sharing on or off. Choose Yes to designate it as a Private network or No to keep it as a Public network.
Bottom Line
Changing the network from public to private on various Windows operating systems enhances your security and connectivity within trusted environments. Whether you’re using Windows 10, Windows 8, or Windows 7, the steps provided guide you through this essential process smoothly. By adjusting your network settings accordingly, you can ensure that your device is optimized for both safety and functionality in environments like your home or workplace. Remember, the right network settings not only protect your data but also improve your overall user experience on your network. That’s all for today. If you like this article, share it with your family and friends.
Recent Comments