Sony Vaio laptops are used by many people and they all face a common problem: Wi-Fi issues. Normally, these issues start arising after you upgrade your operating system. If you have changed Windows, that might have caused these issues. Nowadays, almost everything we do is on the Internet.
From working to using your computer for entertainment, you require the Internet. So, it becomes almost impossible to use a laptop effectively if it has Wi-Fi issues. In this guide, we will discuss a few methods that you can use to fix these issues.
What are the Sony Vaio Wi-Fi Issues?
Even though the Sony Vaio is quite good in other aspects, it gets a little disappointing when it comes to the wireless network. There are a lot of Wi-Fi issues that are commonly faced by Sony Vaio users.
Firstly, it is possible that the Wi-Fi range is dropping. This means that the connection is only retained a little distance from the router. If you go beyond that distance, the connection drops or the speed becomes too low.
It has been seen, in community forums and through company analysis that these issues are common in models from Australia and Europe. In quite a lot of Australian Sony Vaio models, the Wi-Fi could disconnect as soon as the user would go a few feet away from the router.
Moreover, when you try to troubleshoot this issue, you will see the following error: Default Gateway not Available. After this, the adapter would reset. Although this issue can cause some nuisance, it can be solved.
How to fix Sony Vaio Wi-Fi Issues?
The Wi-Fi issues on this laptop do not have anything to do with the manufacturing quality or any sort of bug. Laptops from other manufacturers also have such issues and they are actually simple to resolve. Here are a few methods by which you can resolve Wi-Fi issues.
Method 1: Turn off Bluetooth
In community forums, most people discussed that when they keep Bluetooth off, the Wi-Fi works fine. There is no set explanation for this but this is the easiest thing that you can try. So, turn off the Bluetooth while working and see if the Wi-Fi works fine.
Method 2: Change Settings in Device Manager
It is possible that the connection keeps dropping due to settings in the Device Manager. You can change these settings in order to make the connection stronger.
- Open the Start Menu and right-click on Computer.
- Then, click on Manage and go to Device Manager. From here, go to Network Adapters.
- Then, right-click on Intel ® Wireless-N 7260 and click on Properties.
- Depending on your Sony Vaio model, the wireless card name will be different.
- In the Advanced Tab, look for the card name and then check the settings.
If the setting there is 20 MHz only, it means that the 2.4 GHz network, which normally uses a 40 MHz channel is using a 20 MHz channel on your computer. This is why the speed might drop as you move a little distance.
Here, change the settings to Auto and you are good to go. Try to connect to the Internet again from a far distance and check if the issue is still there.
Method 3: Update Wi-Fi Drivers
This method is for those people who have an Intel Wi-Fi card on their computers. You have to update the Wi-Fi drivers because the connection might be weak due to outdated drivers. For this, you can download the Intel Driver Update Utility from the company’s website.
When you run it, the utility will work on its own by finding the best driver for that particular card. Then, it will update the drivers. Reboot your PC and try using the Internet again.
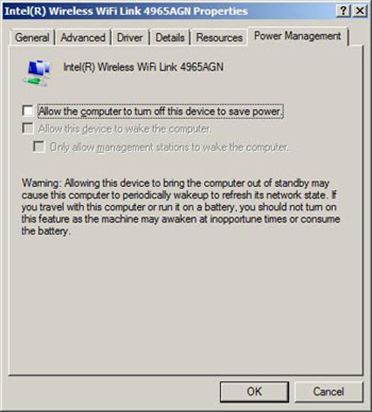
Method 3: Disable Minimum Power Consumption
If you do not have an Intel card on your computer, you can still update the drivers but without that utility. Go to Device Manager as you did in the second method. Then, click on Network Adapters.
Choose the Wi-Fi card of your computer and right-click to select Properties. Here, go to Advanced and click on ‘Minimum Power Consumption. Change this setting to ‘Disabled.’.
You might also find this option as ‘Allow the computer to turn off this device to save power’. Uncheck this box in order to disable this option. Then, click OK. Once you disable this, it is likely that the Wi-Fi issues will go away.
Method 4: Repair Wireless Connection
Another reason for Wi-Fi issues can be a damaged connection. Your computer can repair it on its own if you just give it the instructions. Go to the Start menu and click on Network. Right-click and then open Properties.
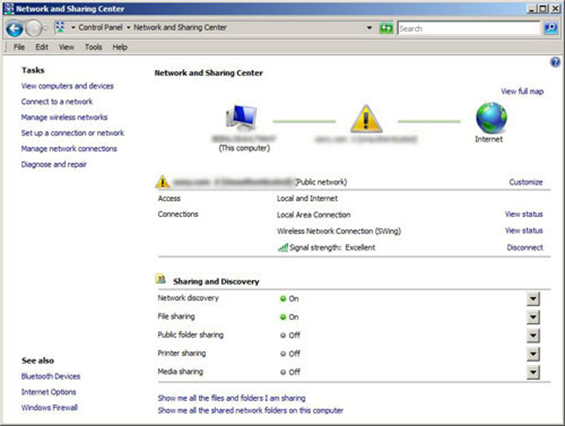
In the left sidebar, you will see the Network and Sharing Center. Click on it. Then, select Diagnose and Repair. You have given the instructions. Your computer will do the rest now.
Method 5: Disable IPv6
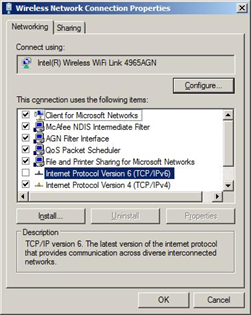
You can also try to fix the Wi-Fi issues on your laptop by disabling Internet Protocol Version 6. To do this, go to the Network and Sharing Center. Click ‘View Status’. A status window will open. Click on Properties. When you see the option for Internet Protocol Version 6 (TCP/IPv6), unselect it. Then, click OK to finalize the settings.
Method 6: Enable ‘Obtain IP Address’
It is possible that some options are not enabled on your computer. To do this, go to the Network and Sharing Center. Click ‘View Status’ again and then click on Properties. You will see the same window as you saw in the previous method.
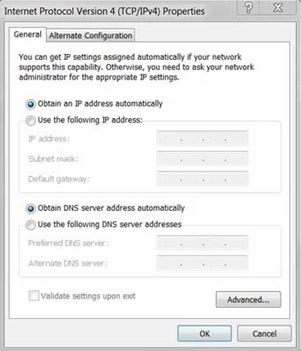
Double-click the Internet Protocol Version 4 (TCP/IP4). Option. Another window will open where you will see the general IP and DNS settings for your computer. Select the ‘Obtain an IP address automatically’ and ‘Obtain DNS Server address automatically’ to make sure that they are turned on. Click OK to make this setting final.
Conclusion
Wi-Fi issues will always cause problems, especially if you need the Internet for working or just chilling at home. This is why it is important that you know what to do when the Wi-Fi settings start to act up. We have added simple and effective methods in this guide to help you fix Wi-Fi issues on your Sony Vaio computer. Hopefully, it will help you in solving your Wi-Fi problem.
Recent Comments