Even though the 2.4GHz Internet connection is commonly used in most devices and routers, it is not the best in terms of speed. On the other hand, the 5GHz is much speedier and allows you to download files quickly. It does not have a longer range as compared to 2.4GHz but it does have a much faster speed, which is why most people prefer it over the 5GHz.
The issue with 5GHz is that it is not compatible with all devices. Despite having an expensive router that supports 5GHz, you will not be able to use the service if your device does not support the frequency. This is because 5GHz is a relatively newer thing and older devices do not have the option for it.
You can connect to the 5GHz network if it is available on your computer or mobile phone. For this, you have first to check if the device is compatible or not. While connecting to the Wi-Fi, a lot of users experience that they are unable to either see or connect to 5GHz. In this guide, you will learn how to connect 5GHz on any device so that you can enjoy faster loading and downloading speeds.
Why is not 5GHz not showing on your Device?
A lot of users come with the question, ‘Why is Wi-Fi not showing’ because they are unable to connect to 5GHz. There are many reasons for this.
- Your computer does not have the right hardware to connect to 5GHz bandwidth.
- Your router is not compatible with 5GHz bandwidth or does not support it.
- The Wi-Fi adapter drivers installed in your device are outdated or corrupted.
- You have not set up 5GHz on your computer or router.
There are different ways to connect to 5GHz Wi-Fi by solving these problems. In some of these ways, you will learn how to see if your device or router is compatible, while other ways will teach you how to connect to the 5GHz network.
How to Check if Your Computer Supports 5GHz in Windows 7,8, 8.1, and 10?
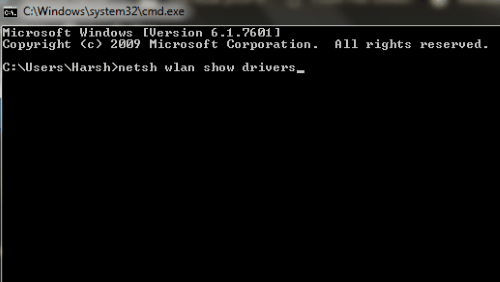
Before you try to connect to the network, you have to check if your computer supports it or not. To do this, press the Windows and R key at once. When you see the Run dialog box, type in cmd and then press Enter to be directed to Command Prompt.
Type this in the Command Prompt:
netsh wlan show drivers
You will be able to see the LAN driver properties of your PC. Go to Radio Types Supported. These will be shown as numbers.
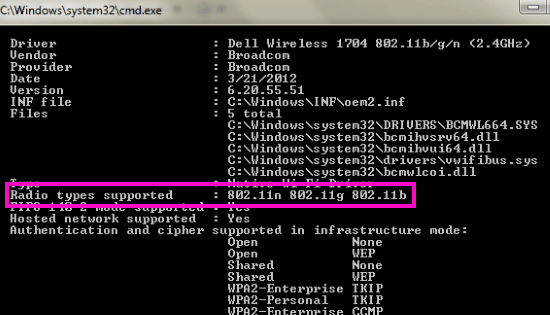
- 802.11g 802.11n means that your PC only has support for 2.4GHz bandwidth.
- 802.11n 802.11g 802.11b means that your PC only has support for 2.4GHz bandwidth.
- 802.11a 802.11g 802.11n means that your PC has support for 2.4 and 5GHz bandwidth.
If your computer has support for the 5GHz bandwidth network, then you can go ahead and check if your router is compatible or not. If your PC does not support it, then you have to upgrade the Adapter hardware.
Checking for Router Compatibility
This is quite easy to check as you can just go to Google and search for the specifications of your router. If you still have the box that your router came in, you can read the specs in the booklet that came along with the router.
The router model number is on the device, along with the name of the manufacturer. You can simply go to the manufacturer’s website and search for that particular model. Check if your router supports 5GHz or not. If it does, then you can connect to 5GHz bandwidth on your device.
How to Enable 5GHz Wi-Fi on Windows 7, 8, 8.1, and 10?
The method for enabling 5GHz on all Windows is almost the same. Before you connect, you should have followed the previous steps to check the compatibility of your router and device.
Method 1: Using Device Manager
This is possibly the easiest and most effective method to connect to 5GHz bandwidth on your device. Press the Windows and X keys at once and then click on Device Manager.
- Go to Network Adapters. When you click on it, you will see an expanded menu.
- Go to a Wireless adapter.
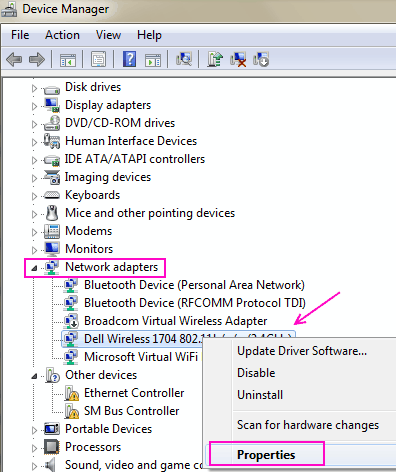
- Right-click on it and then select Properties.
- In the Properties, click on Advanced.
- Find the 802.11n mode here and then choose it.
- On the right side, you will see ‘Value.’ Change it to Enable.
- Click Ok.
Now, restart the PC and check if you see the option to connect to the 5G network in the Wireless Network Connections. If this does not work, you can follow the method given below.
Method 2: Setting the Bandwidth
For this method, go to Device Manager as you did in the previous method.
- Go to Wireless Adapter Properties and click on Advanced.
- Click on the Preferred band option.
- On the right side, you will see the Value menu. From here, select the option for Prefer 5.2GHz and click on OK.

Restart your computer to see if it shows the 5GHz option now. If you are unable to see the Band option in the Value menu, it is an indication that your computer is not compatible with 5GHz.
Method 3: Update Drivers
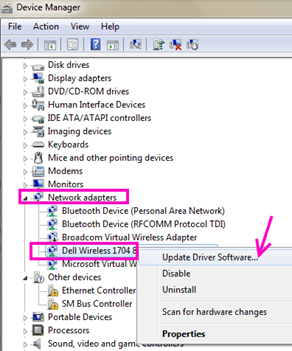
If the Wireless Adapters are outdated or not proper, you will not be able to use 5GHz on your computer. You can update them through Device Manager. Go to Network Adapters and then to Wireless Adapter driver.
- Right-click on it to see the context menu.
- Select Update Driver Software.
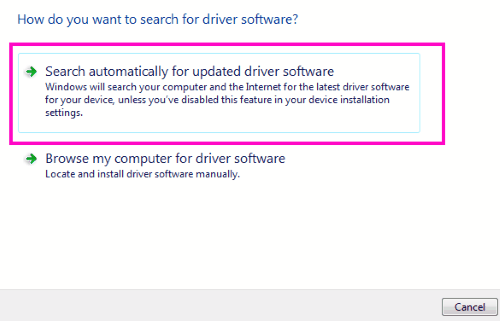
- When you click on it, you will see two options. You can either update the drivers manually or update them automatically.
- Click on ‘Search automatically for updated driver software.’ Windows will do the search for any latest drivers that are available.
To completely update the drivers, follow the instructions given on the screen. After updating, restart your computer and check if the 5GHz network shows in the options. If both the router and device are compatible with 5GHz, then this method will surely work.
Method 4: Update Drivers Manually
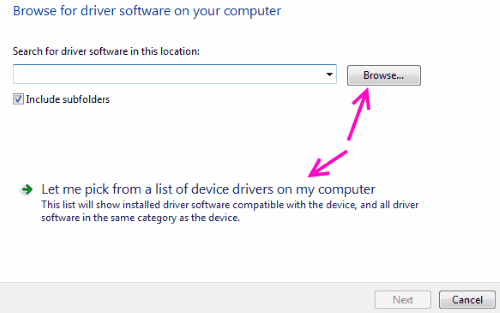
To update drivers manually, go to the website of your computer’s manufacturers. Download the latest Wi-Fi drivers from the website. Then, follow the same steps as you did in the previous method. When you get to the last step, select ‘Browse my computer for driver software.’
- Browse for the folder when you download the new drivers.
- Select the driver.
- Click on Next and follow the instructions given on the screen.
Now, restart your computer and check if the 5GHz is enabled. If your PC fails to detect 5GHz bandwidth, try the first and second methods again to enable this support.
How to Connect to 5GHz Wi-Fi on Mac?
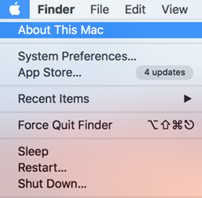
Just like Windows, you have to check if your Mac is compatible with 5GHz bandwidth. To do this, go to the Apple icon on the left corner of the screen and click on About this Mac.
- Then, click on System Report, and in the Networks menu, choose Wi-Fi.
- Check the Supported PHY modes.
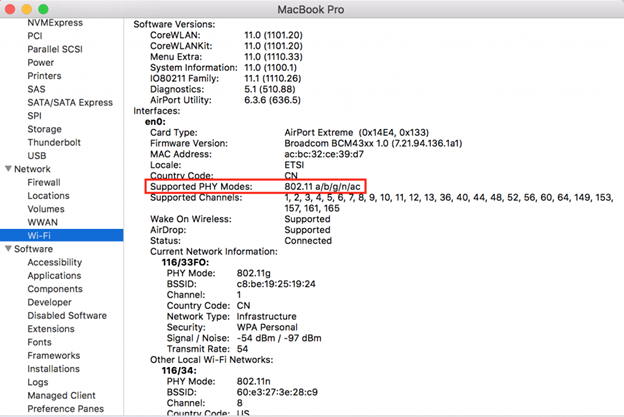
If you have previous versions of the OS, go to the icon and then to About this Mac. Click on More Info and then on System Report. Find Wi-Fi under the Networks option and check which PHY modes are supported. Check the value in the PHY modes with the table below to see if your Mac device is compatible. If it is, then you can connect to the Wi-Fi like you normally would.
| Specifications | Bandwidth |
| 802.11a | 2.4GHz |
| 802.11b | 5GHz |
| 802.11g | 2.4GHz |
| 802.11n | 2.4GHz and 5GHz |
| 802.11ac | 5GHz |
To check if you are connected to 2.4GHz or 5GHz, hold the option key and click on the AirPort icon. Here, you will be able to see which channel you are currently on.
How to Connect to 5GHz on Ubuntu?
If you have an Ubuntu and you want to connect to the faster 5GHz bandwidth on it, you can do so by following the steps given below:
- First of all, run the command: $ iwlist wlan0 scanning | grep -C3 <name of your network>
- There will be 2 entries for this network.
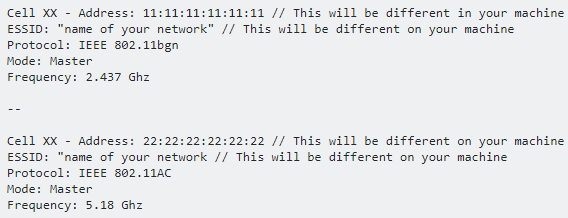
- In this example, you can see the address along with the frequency. The BSSID for 5GHz bandwidth, in this case, is 22:22:22:22:22:22.
- Go to Network Connections and then to Edit Connections.
- Select the network connection that belongs to you. If there are two, you can select any one of them.
- Click on Edit and then go to the Wireless/Wi-Fi tab.
- Click on the BSSID menu and select the one matching 5Ghz network. In this case, it is 22:22:22:22:22:22.
- Now, switch to General and check the box ‘Automatically connect to this network when it is available.’
- Change the connection name to your network name. Do not change the SSID.
- Then, click on Save.
- If there are two entries in the Network connection list for your network name, click on the entry labeled ‘your network name.’
- Then, click on Edit and go to the Wireless tab.
- Click on the BSSID menu and select the matching BSSID for the 2.4GHz network. You can also leave this empty.
- Go to General and uncheck the box labeled ‘Automatically connect to this network when it is available.’
- After setting the connection name, click save.
- Now, disconnect from the network and connect again.
You will be connected to 5GHz now. If you want to connect to 2.4GHz again, simply do the opposite of these steps.
How to Connect to 5GHz on iOS devices?
If you want to connect to faster Wi-Fi on your Apple phones, you need to make sure that your device is compatible. The older versions of the Apple phones are not compatible with 5GHz, while the newer models do support this bandwidth.
Some models, such as 5S, support 5GHz, and 2.4GHz. In these models, you can force the device to use 5GHz by changing the settings in the router.
- Go to Device Settings.
- Click on Advanced Settings.
- Set the router to the 5GHz channel only.
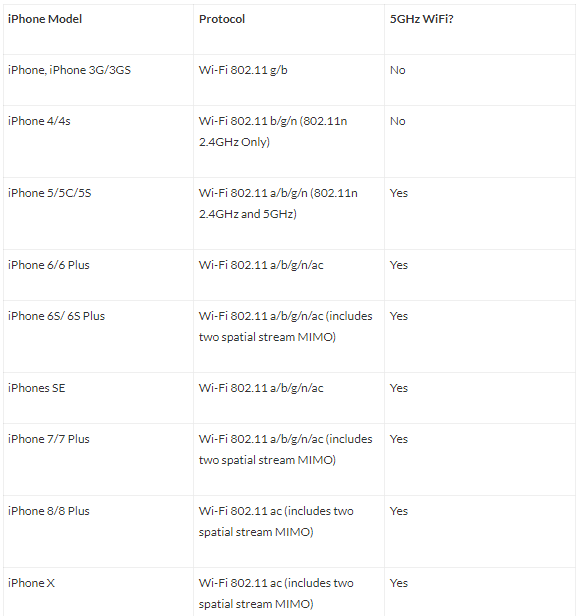
There is no option for forcing the iPhone to connect to 5GHz from within the iPhone. You need access to the router to change these settings. However, naturally, your iPhone will connect to a stronger network by default. For example, if your iPhone supports both bandwidths and both are available, it will connect to the 5GHz when you turn on the Wi-Fi because of the better strength of the connection. Here is a list of the phones that are compatible with 2.4GHz or 5GHz.
How to Connect to 5GHz Wi-Fi on Android?
One way to get the most out of your Android device is to connect it to 5GHz for faster speed and a better Internet experience. You can do so by ensuring that every Wi-Fi you connect to, is 5GHz at all times. However, your device should support 5GHz for this.
- Go to Settings on your Android device and then to Wi-Fi.
- Tap on the three-dot icon on the side and then go to Advanced.
- Here, tap on the Wi-Fi frequency Band.
- You can choose a band in this window. Choose the 5GHz if you want to connect to it.
- Now, whenever you connect to Wi-Fi, it will use 5GHz bandwidth.
As there are not many Wi-Fi networks that use 5Ghz bandwidth, you will see much fewer Wi-Fi options now. If you want to see more options, change the settings to 2.4GHz, and you will see the networks with the respective compatibility.
Conclusion
Even though 5GHz is very beneficial in terms of speed, it is not uncommon to come across scenarios where you are unable to find the connection or connect to it even if it is available. In this guide, we have mentioned different ways to connect to 5GHz on your Windows and Mac computers, Ubuntu, iOS, and Android devices. For all of these methods to work, your device and router must show compatibility with the network. Hopefully, by now, you will have learned how to connect to 5GHz Wi-Fi on your own device.
Recent Comments