Windows 10 is the latest OS from Microsoft and it is better in many regards from the previous versions. As compared to the older versions, it has many distinctive features; one of them is better booting time. The average boot time of hard drive is around 30 to 40 seconds. In spite of this, some people might still want to upgrade from their hard disk to an SSD that accelerates to 10 – 13 secs. There are many other reasons for doing this.
Why make SSD as bootable
As mentioned above, SSD is almost 200 % faster than the hard drive. But this speed comes with a price tag. Higher the storage capacity of an SSD, the higher its price tag. So it is that you make the SSD dedicated to booting and the hard drive for storing the data. In case, there is too much data on your hard drive, it will be hard to find an SSD of the same size at a reasonable price. So, keeping the SSD as a boot drive is a no brainer.
Why use an SSD?
When you already have a hard drive on your computer, why would there be a need for SSD. This is because SSD can make the computer work faster and better. If your computer is having trouble loading bigger files or running multiple applications as one, you can upgrade from hard drive to an SSD to solve this issue. SSD also has a lot of other benefits:
- It does not make a noise while working.
- It does not get damaged as easily as a hard drive.
- It has a faster re-write speed.
Can I change HDD to SSD?
Yes, you can do that and it is a simple process that is carried out by cloning software. When changing from HDD to SSD, make sure that the sizes of both the drives is same.
How Can I move Windows 10 to a new SSD?
You can move the Windows to an SSD without having to reinstall it. To install a new Windows on SSD, you would have to format the partition and then install a new copy of Windows on to the SSD. This could be troublesome. Instead of doing this, you can easily move the current OS to the new SSD in your computer. This process is called cloning and you can simply clone the existing Windows to the SSD.
Things to Do Before Hand
The most important thing that you need to do beforehand is to make a backup of your device. If there is anything important on the hard disk, make sure that you have a backup for it. Anything could go wrong during the cloning sessions and all your data could be deleted. You can create a backup on an external drive or online software.
Secondly, you should delete any unnecessary files. Make up extra space on your hard drive so that the contents can be copied easily. If there are any media files, games or applications that you do not use, you should just delete them.
Things You Need
There are three main things that would need; hard drive, SSD and cloning software. Of course, the hard drive will already be present on your computer. buy an SSD that is of the same size as your hard drive. if it is a smaller size, it will not be able to take all the data from the hard drive, during cloning. If your SSD is of smaller size, delete unnecessary files from the hard drive to make its contents lesser.
Then, you will need a cloning software. This software makes things much easier as you just have to run them and they do the work. You can use any one of the two software mentioned below:
- EaseUS
- AOMEI Backupper Standard
They both get the job done so the choice is up to you.
Steps to Follow
Once you have prepared for the cloning process, you can follow the steps given below to move existing Windows to SSD.
- Download AOMEI cloning software and run it.
- Connect the hard drive to your computer and launch the program.
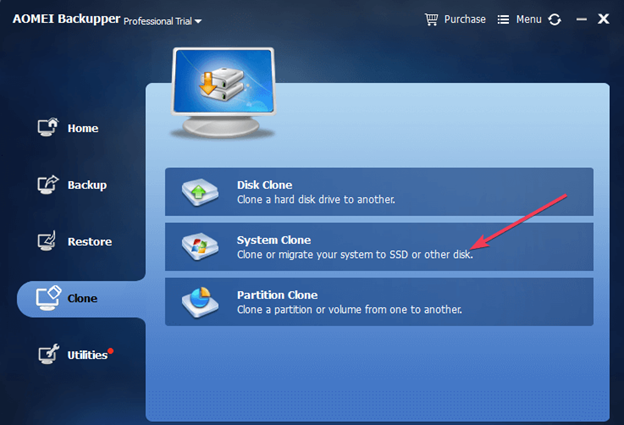
- In the menu, you will see an option for Clone. Click on it and then choose System Clone.
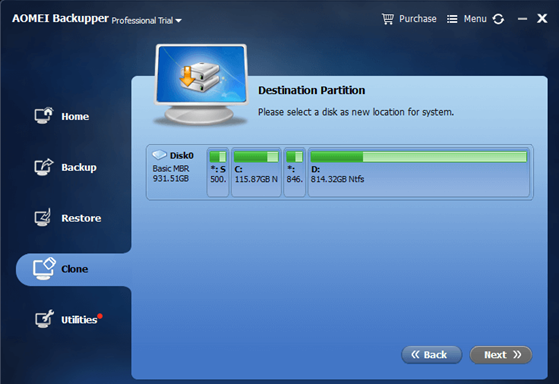
- On the next screen, the software will ask where you want to clone the OS too. Select SSD and click on Next.
- Just keep clicking on Next until the process starts. Wait for the cloning process to finish and then restart your computer.
Using the EaseUS Todo Software
If you are using EaseUS as the cloning software, you have to open it and choose ‘Clone’ and then choose ‘Disk Clone’.
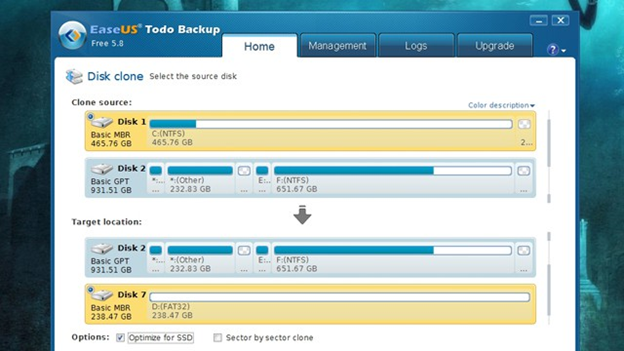
- From the options, select SSD as a target drive and hard drive as the source drive.
- Click on the ‘Optimize for SSD’ box to checkmark is. This will format the partition for SSD.
- Click Next and the process will start.
- When the cloning is finished, your computer will restart.
Removing the Original Drive
Once the Windows is cloned successfully to the SSD, you have to remove the HDD partition which has the OS in it.
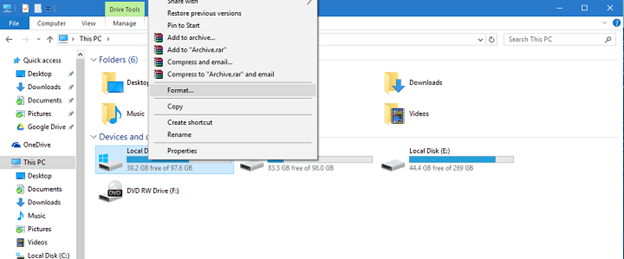
- Go to My Computer or PC.
- Right-click on the system drive.
- Select Format.
Possible Errors During Cloning
If you have chosen the right target and source drive, there should be no errors during cloning. However, there could only be one error i.e. your drive is too big. To solve this, you would have to delete more things from your hard drive to make it smaller. Otherwise, there will be no place on the SSD for all your data and the cloning will not take place. So, delete as many things as possible and start the transferring process again.
Why is Migration/Closing better than Reinstallation?
When you upgrade to an SSD, it is easier and better just to migrate the OS to the SSD instead of installing a new one. Installing new Windows is a time-consuming and tedious process. Moreover, it is also quite difficult as compared to migration. In migration, a third-party software does all the work while in installation, you will have to do some manual work.
For the new installation, you will have to install all the programs all over again, which will take too much time. Also, the data that was already present on your C drive will be deleted.
How to Change Boot Drive to SSD?
After you have upgraded from HDD to SSD, you can now make the SSD your primary boot drive. There is some manual work involved in this process so you should be prepared to watch a few videos to learn this properly.
- First of all, restart the system.
- Press Del, F2 or F12 to go to BIOS settings.
- Go to the Boot option and choose SSD from the boot menu.
- If you cannot see SSD in the options, disable the secure boot section and SSD will appear as a bootable drive.
This would vary slightly for different computers so read the instructional manual of your computer to understand the BIOS completely. This guide must have educated you on how to migrate OS to your SSD, without reinstalling it, and how to make SSD the primary boot device for your computer. With this change, you can boost the working of your computer.
Recent Comments